Connect Notion Scan to your workspace
Create a read-only Notion connection, copy its access token, and choose which pages Notion Scan can see. About five minutes, all inside Notion.
Notion Scan reads the structure of your workspace (pages, databases, properties, and who last edited what) to produce its analysis. It does not read page body text and it never changes anything. To do that it needs a small read-only connection that you create inside Notion. This page walks through it with screenshots.
Notion changes its settings screens from time to time. Everything below was checked against Notion on the date shown above. If a screen looks different, the labels are usually still close; if something no longer matches, tell us at hello@notionscan.com.
Before you start
- You need to be a workspace owner in the Notion workspace you want scanned. Notion only lets workspace owners create connections. If you are not one, forward this page to someone who is.
- Keep the Notion Scan onboarding form open in another tab. The access token you copy in Step 3 gets pasted there.
Step 1: Open Notion's developer portal
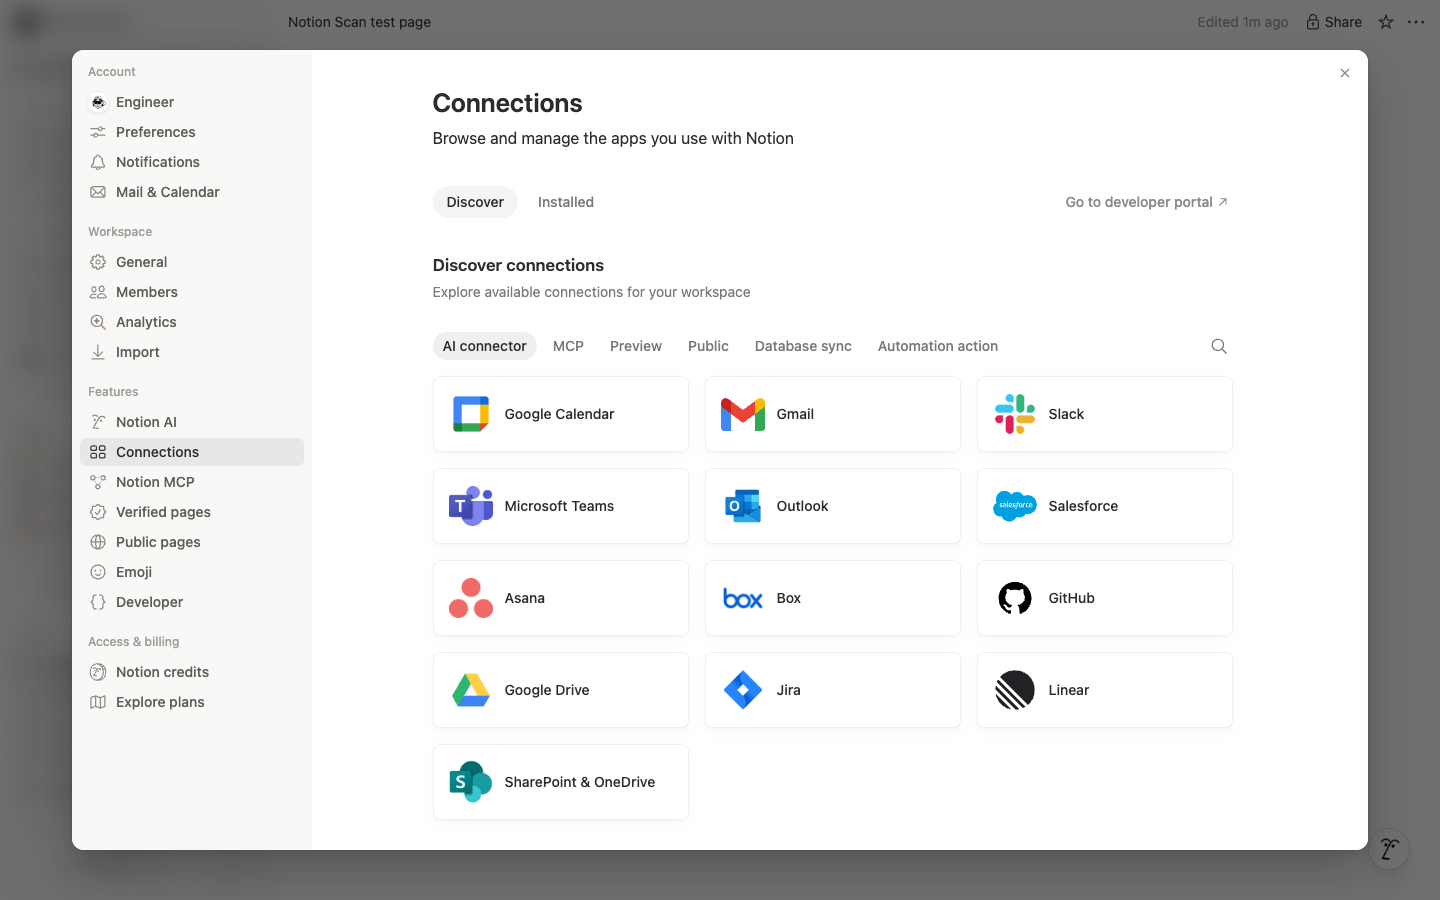
- In Notion, click your workspace name in the top-left corner and choose Settings.
- In the left column, under Features, choose Connections.
- Click Go to developer portal in the top right. It opens Notion's Developer tools page on the Connections tab.
You can also open it directly at app.notion.com/developers/connections.
Step 2: Create the connection
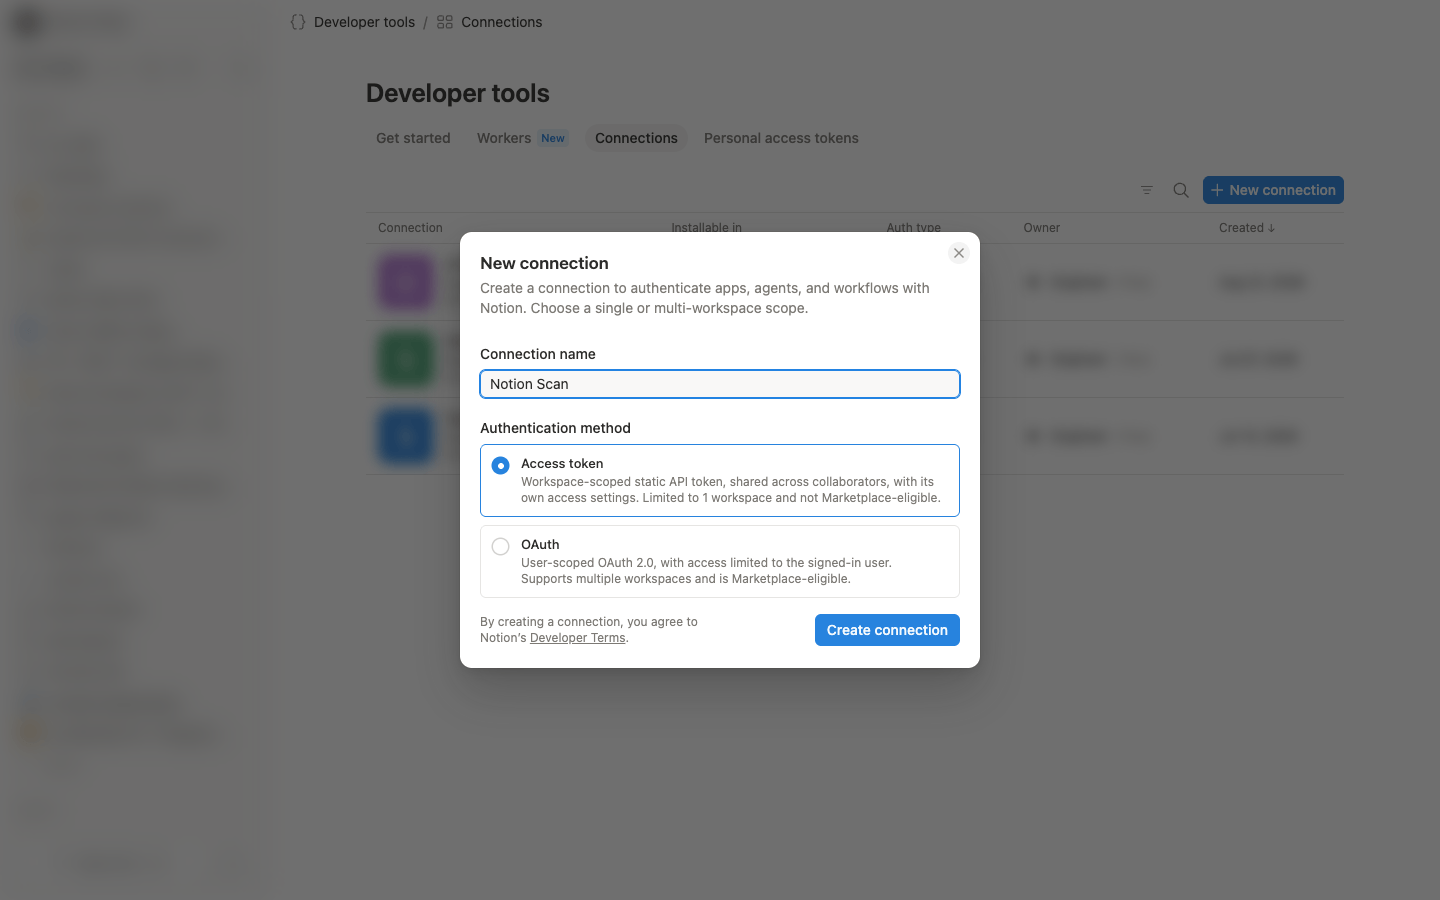
- Click New connection.
- Connection name: type
Notion Scan. Any name works, but this one makes the connection easy to recognize later. - Authentication method: keep Access token selected. Do not choose OAuth.
- Click Create connection.
The connection belongs to the workspace you are currently in. If you have several workspaces, switch to the right one first; the Installable in field on the next screen shows which one it is.
Step 3: Copy the access token
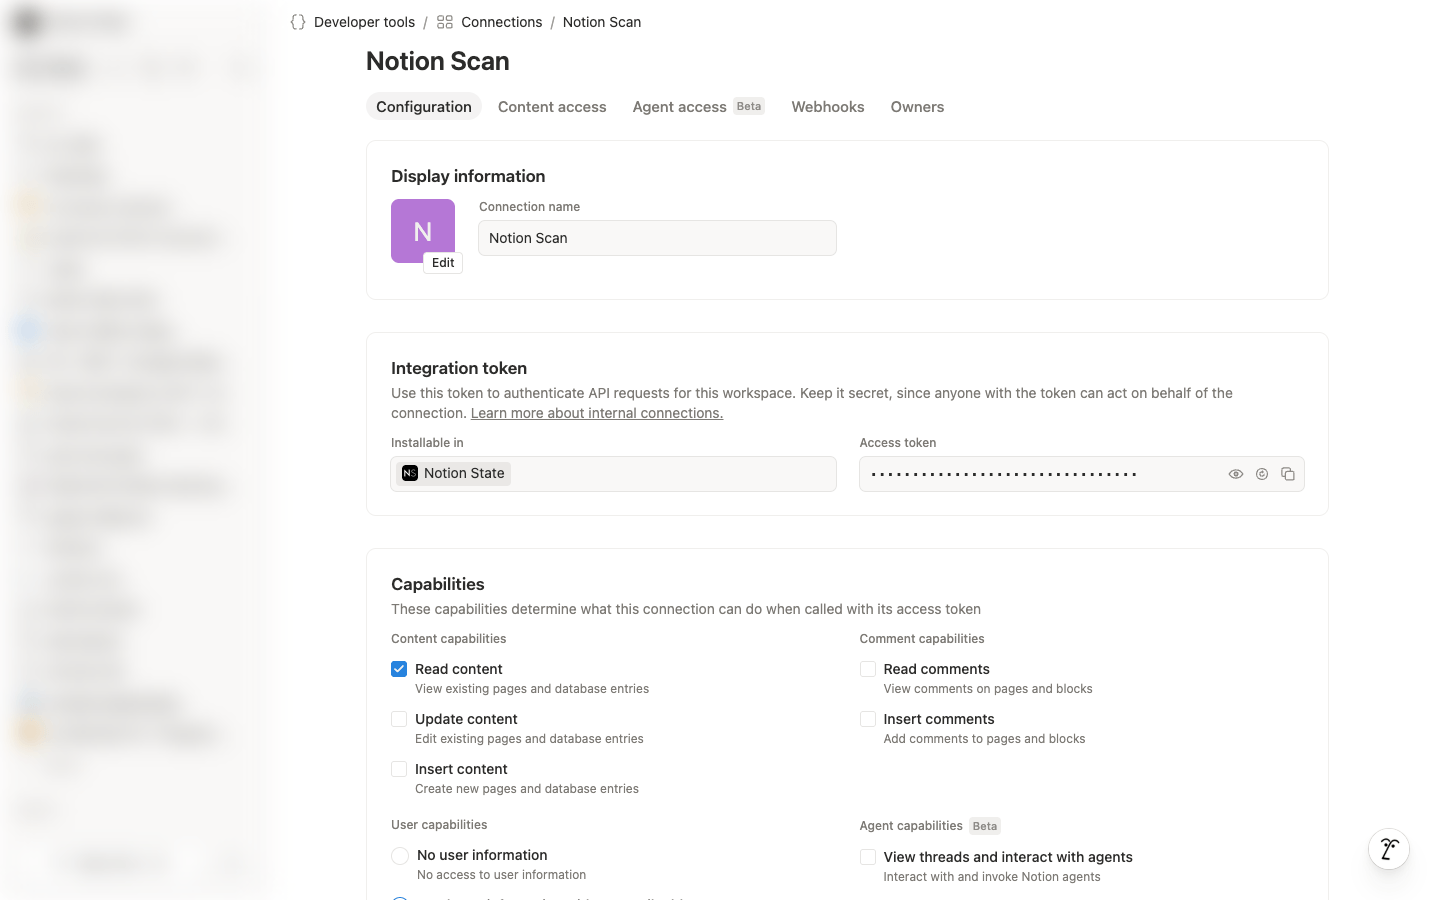
You land on the connection's Configuration tab. In the Integration token section, the Access token is hidden behind dots. Click the copy icon at the right end of the field (the eye icon reveals it first, if you want to see it).
The token usually starts with ntn_. Older connections use secret_; both work. Treat it like a password: paste it only into the onboarding form, never into chat or email. If it ever leaks, the refresh icon next to it issues a new token and the old one stops working.
Step 4: Limit what the connection can do
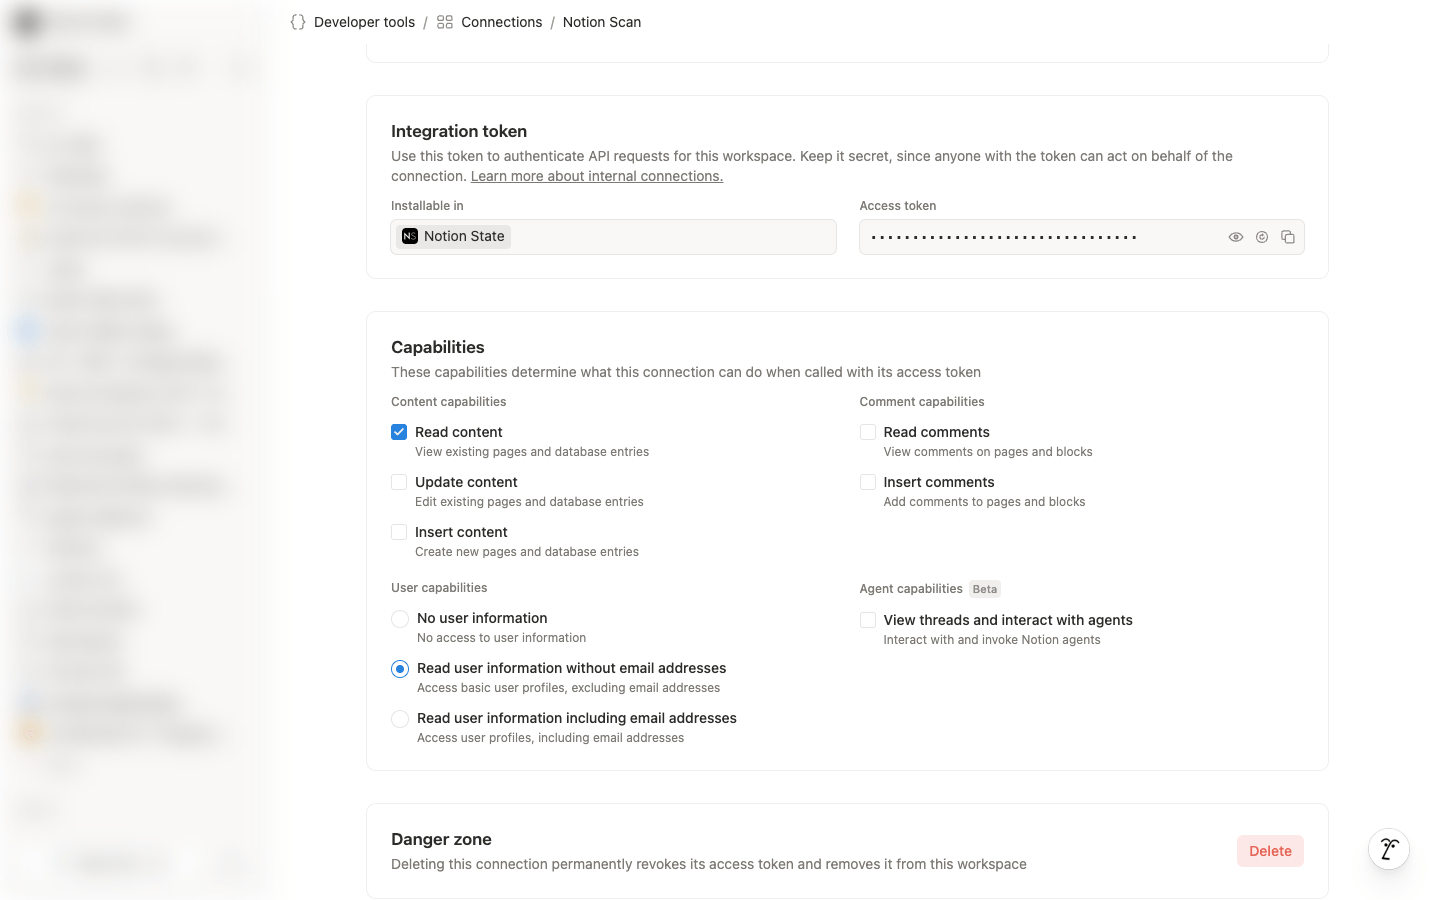
Scroll down to Capabilities on the same tab. New connections start with more access than Notion Scan needs, so set it to exactly this:
- Content capabilities: keep Read content checked. Uncheck Update content and Insert content.
- Comment capabilities: leave Read comments and Insert comments unchecked.
- User capabilities: select Read user information without email addresses.
- Agent capabilities: leave unchecked.
Changes save on their own; a "Connection updated" message confirms it. That is everything Notion Scan needs: it never sees email addresses and cannot write to your workspace.
Step 5: Choose what the connection can see
Creating the connection does not give it access to anything yet. You decide which pages it can see, and anything you do not share is invisible to the scan. Share every teamspace and top-level page you want included.
From the connection's Content access tab
This is the easiest way to cover a whole workspace, because it grants teamspaces and top-level pages in one place.
- On the connection's page, open the Content access tab. It lists everything the connection can currently see, with a remove button next to each entry.
- Click Add pages & databases.
- Search for a teamspace or a top-level page and select it. Access applies immediately, with no confirmation dialog, and everything inside it is included.
- Repeat for each one you want scanned.
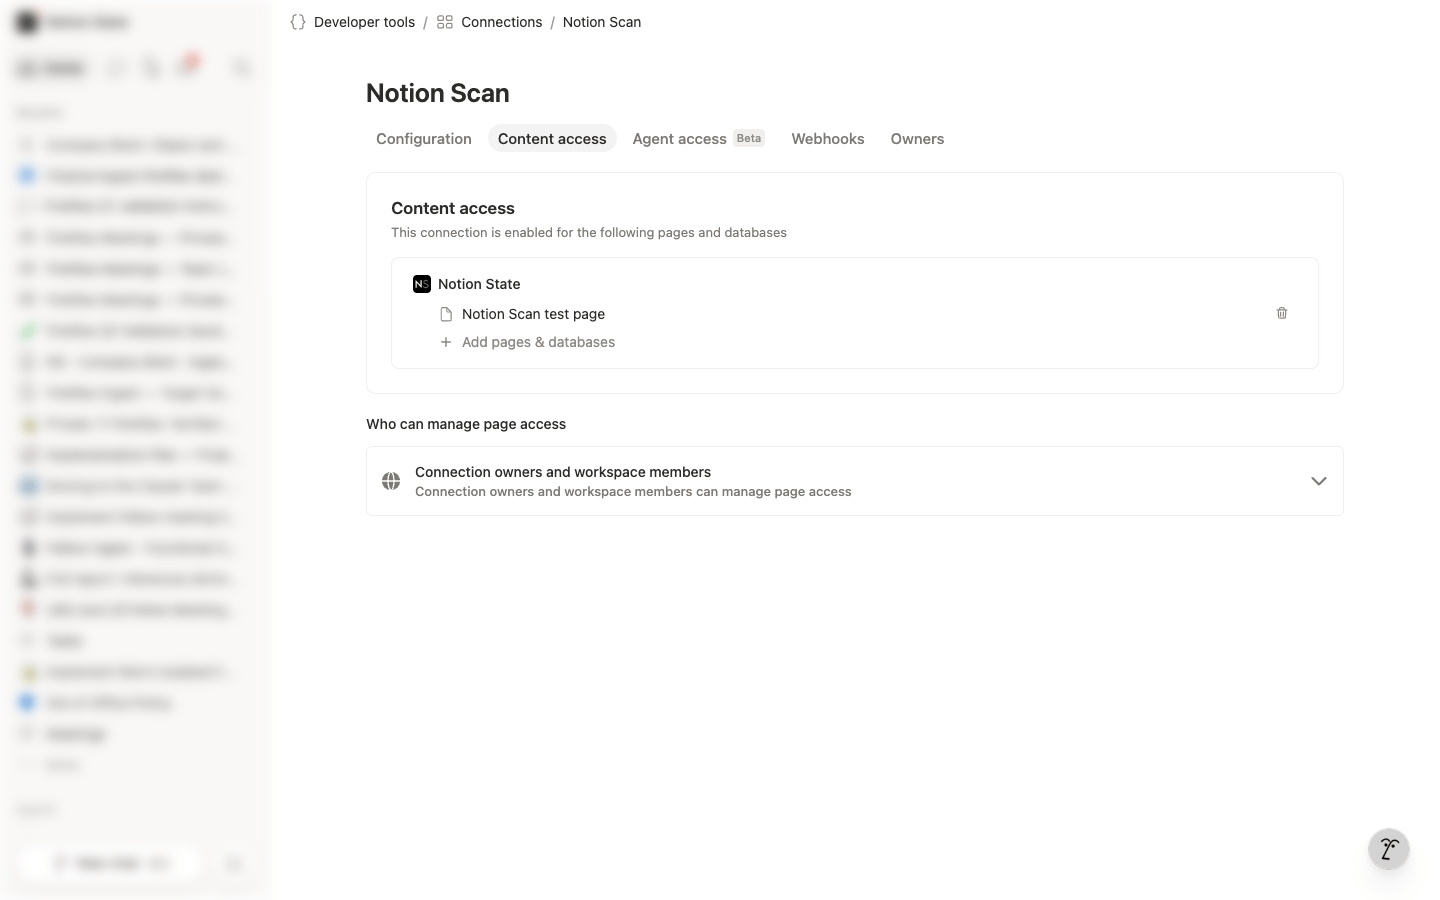
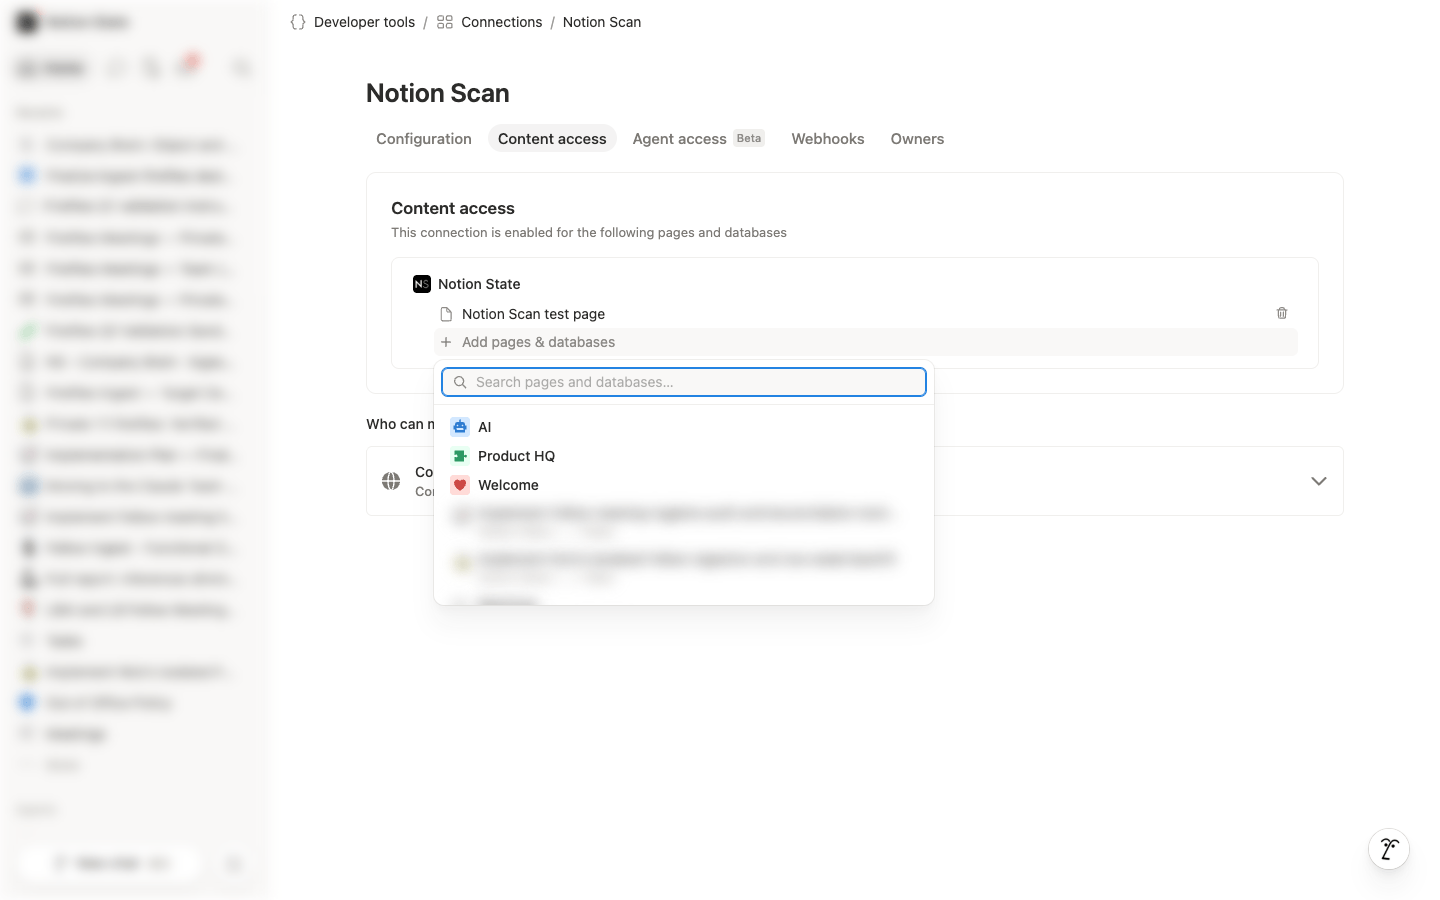
The picker does not list every teamspace. It only offers teamspaces you can already open in full; for a closed teamspace, that means one you have joined. Private teamspaces never appear as a single entry, not even ones you belong to. To include a missing teamspace, add its top-level pages one by one from the same picker, or share it from inside the teamspace with the page method below.
From a page
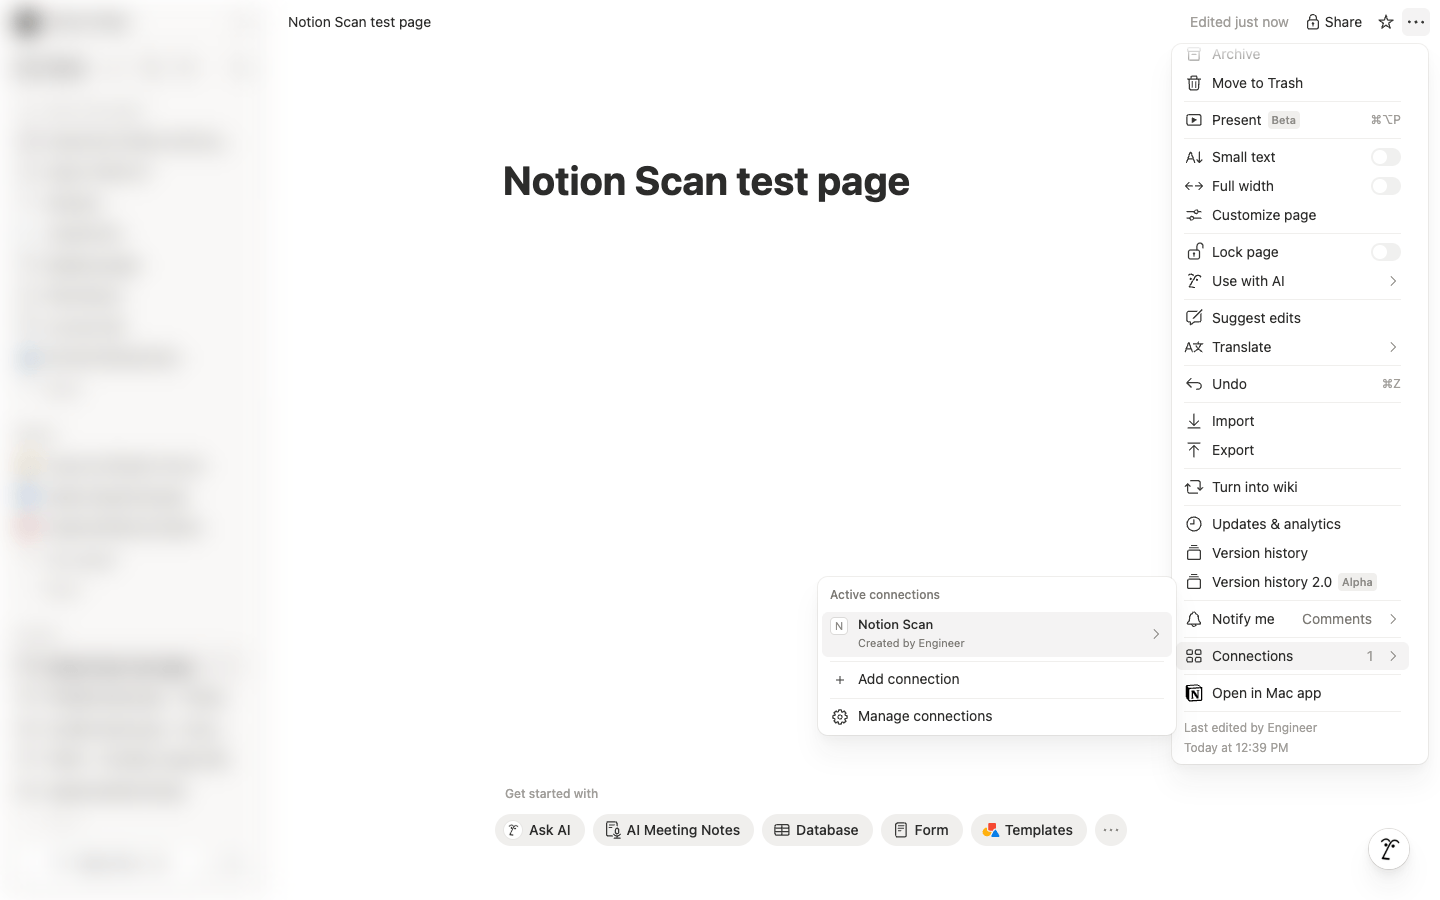
Open the page, click the ··· menu in the top-right corner, choose Connections, search for Notion Scan, and select it.
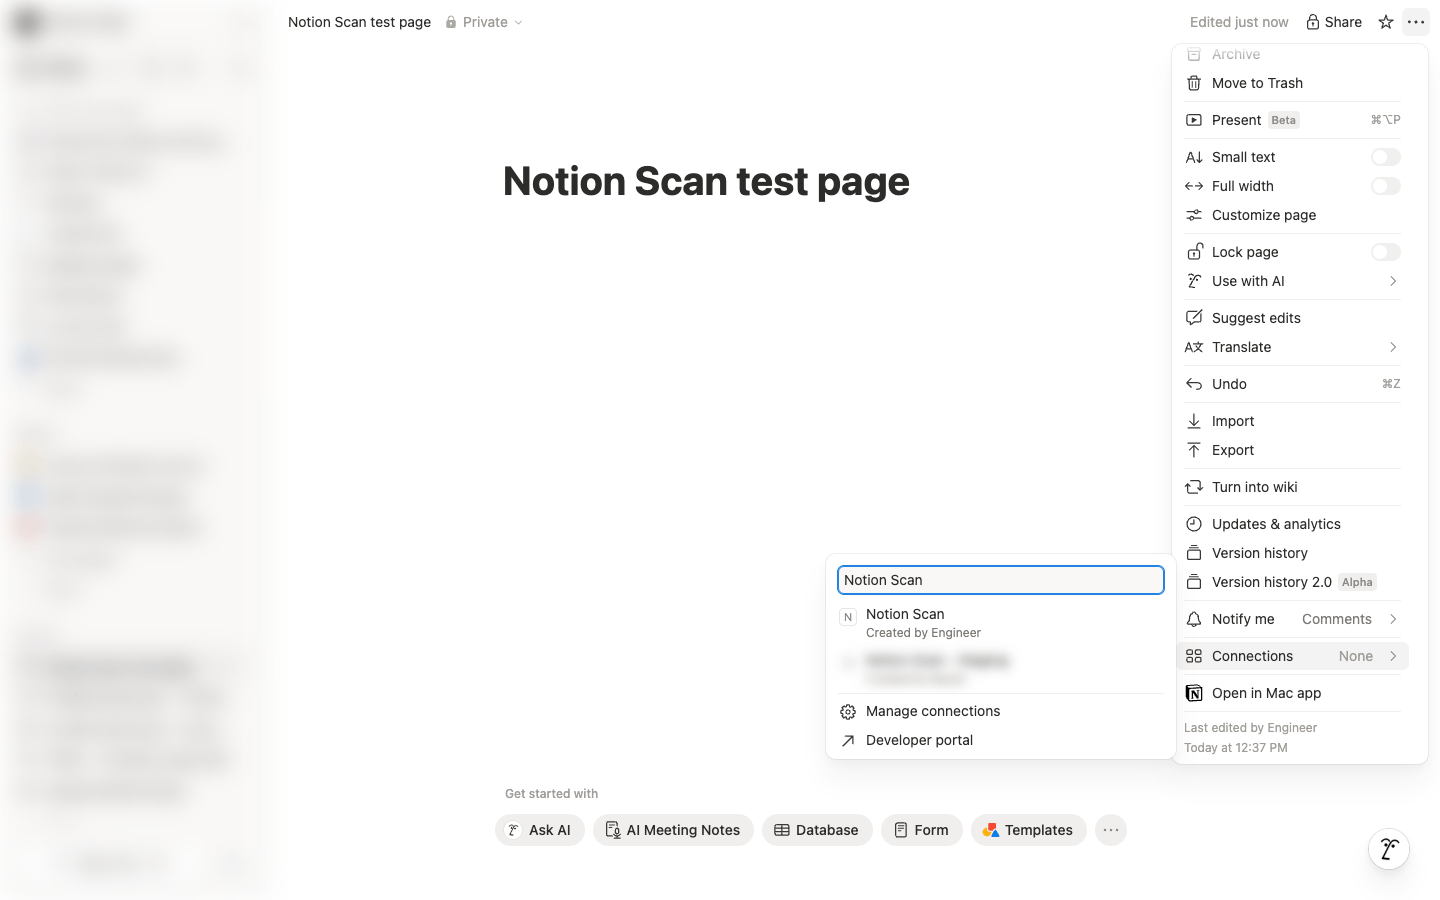
Notion asks you to confirm. The dialog spells out that the connection gets access to this page and its child pages, and that it can only read content.
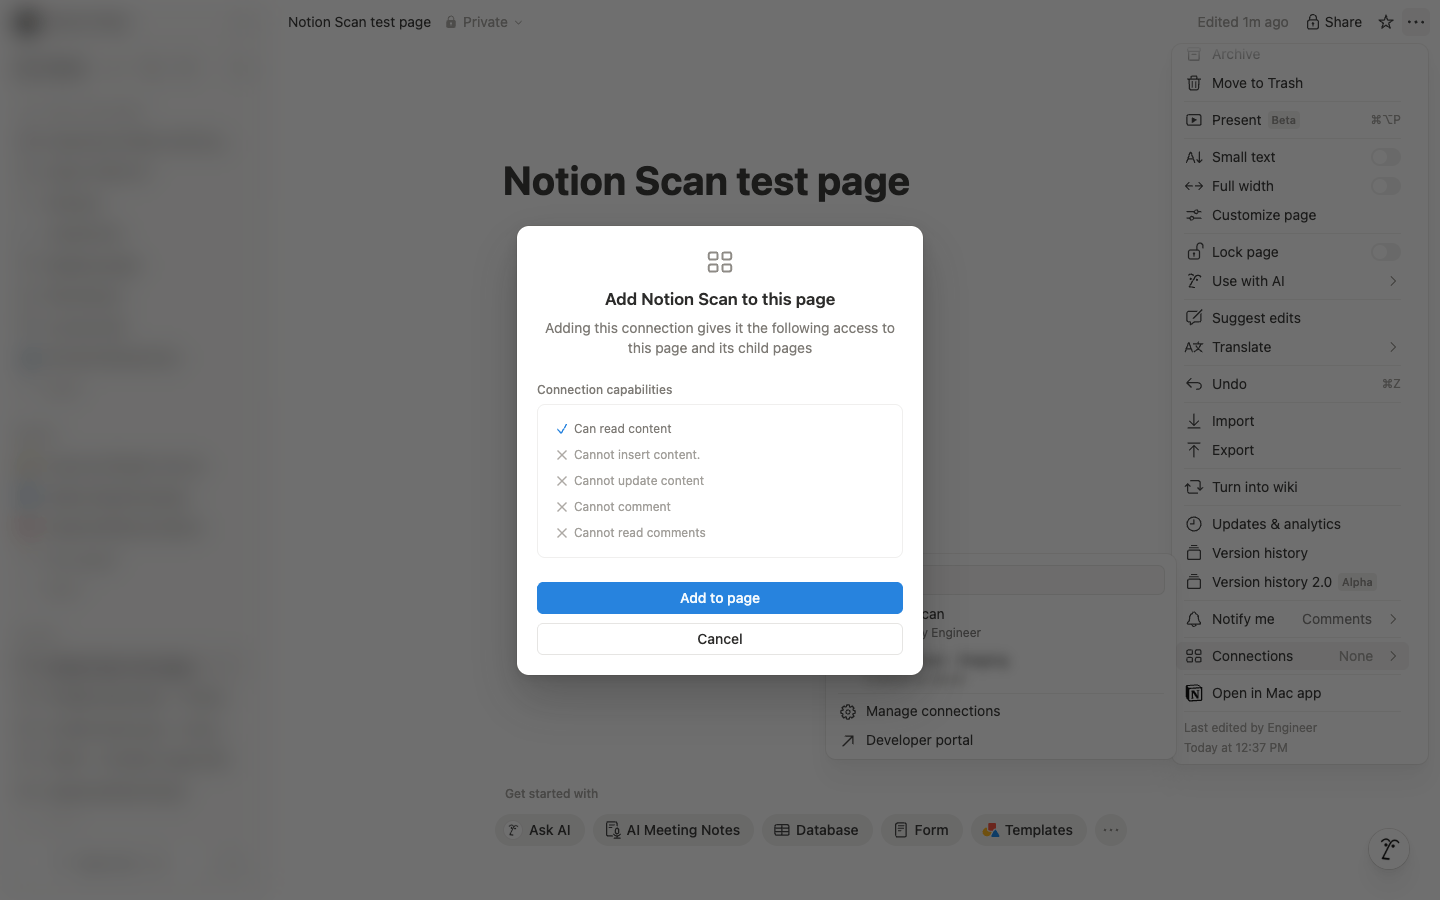
Click Add to page. The page's Connections menu now lists Notion Scan under Active connections.
Step 6: Verify the token in the onboarding form
Back in the onboarding form, paste the access token into the Integration token field and click Verify token. When it works, the form shows Connected to followed by your workspace name. Continue with the rest of the form.
We use the token during verification to look up your workspace's name and ID, which is why the form never asks for a workspace URL.
Troubleshooting
"Notion rejected this token. Check that you copied the full access token from the connection's Configuration tab." Notion did not accept the token. Usually the paste is incomplete, or the token was refreshed in Notion after you copied it. Open the connection's Configuration tab, copy the access token again, and paste the whole thing.
"This token belongs to a person, not to a workspace connection (a personal access token or an app you authorized). Create a connection in Notion's developer portal with the Access token method and use its token." Personal access tokens (created under Settings, then Developer) and tokens from apps you authorized with OAuth act as you rather than as a workspace connection, so the form does not accept them.
"This token is not the access token of a Notion connection. Create a connection in Notion's developer portal (Access token method) and use its token." Notion recognized the token, but it is not a workspace connection's access token; Step 2 shows how to create one.
"Could not reach Notion to verify the token. Please try again shortly." Notion did not answer in time. Wait a minute and click Verify token again.
Verification works, but the scan finds very little. The connection can only see what was shared with it. Open the connection's Content access tab: everything the scan can see is listed there. Add the missing teamspaces and top-level pages as in Step 5. If a teamspace does not show up in the picker, it is likely private; see the note there.
What happens to the token
- It is encrypted at rest and never written to logs.
- It is used only to read workspace metadata: page and database structure, property definitions, timestamps, and contributors. Page body text, comments, and database entry values other than titles are never stored.
- You stay in control. Deleting the connection in Notion (Configuration tab, Danger zone) revokes the token instantly, and removing a page from Content access hides it from future scans.
Details are in the Security Overview and the Privacy Policy.